
Need help with your controls?
Pairing instructions will be supplied in the box with your thermostats. You can find our full list of instructions here.
Please refer to the instruction manual for advice on how to set up your thermostat, if you are still having issues, then please find additional advice below in our FAQs.
Pairing Your Thermostats with Your Heaters
Full pairing instructions for the XLS thermostats come packed with each XLS thermostat and XLS heating panel.
The web pages for each of the thermostats also contain the downloadable set of instructions.
We have made this short video to show you how simple pairing is.
If you need further help, check out our detailed thermostat help guides here.
Full pairing instructions for the T2/R2 thermostat pack come packed with the T2.
The web page for the T2 also has a downloadable set of instructions.
We have made this short video to show you how simple pairing is. If you need further help, check out our detailed thermostat help guides here.
Our XLS and iQ ranges work slightly differently from each other but in summary it is possible to pair multiple panels to one thermostat, as follows:
Herschel Select XLS Range
T-MT, T-BT, T-PL
You can pair multiple Heater Panels to a single thermostat using the standard pairing procedure on the panel instructions.
Herschel iQ Range
MD2, T-MKS, T-MKW
Up to 16 amps of heater load can be directly wired through the MD2. If the overall heater load to be controlled by the MD2 exceeds 16 amps, then an appropriately sized contactor must be used to handle the heater load and the MD2 just switches the contactor.
T2/R2
Multiple R2s can be paired with a T2.
Up to 10 amps of heater load can be directly wired to an R2.
Where overall heater load exceeds 10 amps, you could use a contactor (as MD2 above), but it is probably more pragmatic to use multiple R2s and just pair these to the T2.
You can undo an existing pairing (e.g. if you want to change the assignment of which heater to which thermostat) simply by making the new pairing according to the instructions.
This is true for panel => Thermostat pairings as well as Thermostat => Smart Life pairings.
Herschel’s battery-powered thermostats, the T-BT and T2 should give you a full heating season’s operation on a fresh set of 1.5V alkaline batteries.
However, power consumption of the unit will increase and battery life will shorten if the thermostat is not in good RF contact with the receiver (T2 pairs to R2 and T-BT pairs to the Smart-R receiver). If RF contact is poor, the thermostat will spend a lot of its time (and power) trying to acquire the receiver it is paired to. In tests, we found this can be up to x4 the normal consumption of the unit. Examples of poor RF contact could be due to:
– The receiver is too far away from the thermostat or the RF signal is blocked for some reason (electronic or physical interference): for example this can happen if the R2 has been installed in a cupboard or ceiling void;
– The receiver and heater have been switched off from the mains but the thermostat has been left on.
We also advise you use good quality 1.5V alkaline batteries. Do not use rechargeables unless they are 1.5V.
Thermostat WiFi & App Connectivity
Here are some handy tips to make sure your home network is ready to use Smart Devices.
You don’t want to buy a Smart IoT Device and install it, only to find it does not work, or works sporadically. You can avoid this situation with a few precautionary measures.
1) Ensure your home network actually reaches the parts of your house you are installing your devices in. A Smart Device may struggle to join your network, or may only operate sporadically if it doesn’t have a good signal. Download the Netspot App and use the Inspector to determine the strength of the 2.4GHz signal in each location you want to install a device. (Ignore the 5GHz signal results). You really need a “Green” result in each location to ensure reliable IoT service. If you don’t get a “Green” result, consider implementing a mesh network (essentially network extenders but they interoperate and keep the same SSID and login throughout the house). These devices not only ensure your network will reach the furthest corners of your house using the same network ID, but they also take considerable strain off your router by acting as interim “hubs” for traffic requests.
2) Familiarise yourself with your router’s configuration and check if you can switch the 2.4GHz and 5GHz signals on and off separately. Most IoT devices use 2.4GHz and some require it exclusively during pairing. Unfortunately many ISP-supplied routers don’t always make this choice available -another reason for installing an extender or mesh network, most of which do. Once successfully paired, you can re-enable both signals.
3) Check your subscription bandwidth. You can use Netspot to run a speed test. These days with Fibre optic, bandwidth and quality of service for IoT devices should not be an issue. However some people are not yet lucky enough to have fibre and bandwidth becomes a more contentious resource. The more devices you add; each potentially emitting a couple of hundred bytes a second simultaneously, plus everything else in the house making some sort of bandwidth demand, you run the risk of being network constrained as well as creating bottleneck conditions on the router if your bandwidth is insufficient. Remember IoT devices also communicate both ways, so Upload Bandwidth is important, not just download.
4) Ensure your router firmware is up to date and apply per-device and app updates if these also require updating.
5) Research the App support website for the devices you intend to use and check there are no known incompatibilities between, for example, your router and the app framework you intend to use. These incompatibilities do exist and it is wise to pre-empt any possible issues.
Problems to Look out for:
Difficulty pairing
If you are experiencing difficulty pairing your device to your network, in most cases it will be no clear 2.4GHz signal being available and in rare cases, more than one (so the device does not know which one to connect to – solved usually via the device’s own “alternative pairing mode”.) Be sure the 2.4GHz signal for your network is available for the device and if necessary, stop any 5GHz signal until pairing is complete.
Changes to the App don’t reflect in changes to the device and vice versa.
If the device appears available (i.e. not “offline”) in the App and you are able to make changes in the app, then if the device itself is not updating chances are you have some form of internet or connection issue related with your network. This could be a combination of points 1 to 5 above and you should check through all of them. Is it happening with devices that were also initially hard to pair? Some IoT devices have their network status available in “Device Information” on the App, so check that first. Signal strength of -55dBM is very good. A signal strength of -70dBM or higher is very poor so a device may appear “connected”, but is only partially so and may not function correctly.
“Offline” devices that should be online
Check the device proximity to the network. If the device in all other respects shows it has a strong signal, but still regularly goes offline, check if rebooting your router fixes the issue. If it does, it is a possible sign of router overload and not managing devices actually connected to it, versus those it thinks are. (There are all sorts of reasons why, not in the scope of this article to address). If you have the technical skills, assigning a static IP to the MAC addresses of the IoT devices or assigning a specific DHCP range only to your IoT devices should fix this problem.
All Herschel Thermostats can operate without wifi.
Using wifi makes the controls easier to use and enhances the range of control features available to you (like linking with a PIR sensor; Voice Control or Group Control of multiple thermostats). It also allows you to manage your thermostats while you are away from home.
But all our thermostats will work as thermostats (i.e. turn heaters on if it is too cold and turn them off at the correct temperature) without wifi.
Specific wifi-free operation varies per controller:
Without Wifi, T-PL; T-MKS and T-MKS operate only in manual mode (i.e. manage to a fixed set temperature only).
All other thermostats (T-BT; T-MT; MD2; T2/R2) offer a full weekly schedule of 4 programs a day.
T-BT is not wifi enabled.
What if wifi fails while my thermostats are connected?
Should wifi be lost for whatever reason while your thermostats are running, then:
T-MT, T2/R2, MD2 will run with the locally stored schedule.
T-PL, T-MKS, T-MKW will continue running the last set temperature.
(Note: T-BT is not Wifi Enabled and therefore cannot pair.)
The root cause of App pairing problems lies in the phone and the thermostat failing to connect successfully to the same 2.4GHz local wifi network.
The ideal pairing location would have just a single 2.4GHz wifi network with no network extenders or other available network connections. However, many homes and offices have multiple available networks, hotspots and network extenders offering 2.4 & 5GHz connections; not to mention “Wifi Assist” on your mobile trying to switch you over to 4G; strong signals from neighbours houses etc. So very often it is possible your phone may be on one network (which may not even be your home network), whilst the Thermostat itself initially has no idea which network to connect-to out of the many choices it may be offered.
So we need to get the Mobile App and Thermostat on the same 2.4Ghz network in order to pair.
1. If you are getting a message “Device Not Found” after attempting pairing, perform this step first, otherwise go to Step 2 below.
If you are getting “Device Not Found” and only have a single network then ensure the controller is as close as possible to the router during pairing. Then attempt to pair using the procedures in the installation manual. Once you have paired successfully, move the controller to its intended location. Please note though, like any wifi device, if the thermostat is outside the network range of your router, you will not be able to manage it via the app. You cannot manage a wireless thermostat on a network extender (where attached devices are just “guests”. The thermostat and app both need to be paired and operated on the main network.
2. For all other failure messages found during pairing, please perform the following steps.
– If you have an Apple IoS phone with “Wifi Assist”, please disable it before proceeding. (You can re-enable it after pairing is complete). This will keep you on your home wifi networks.
– If your router is “Dual Band”, i.e. it offers both 2.4GHz and 5GHz signals, check and amend the following:
Either
– In the connection settings on your phone, your router may publish two SSIDs: one marked including the numbers 24; one marked including the number 5. Please be sure to connect to the option with the numbers 24.
Or
– Your router settings (usually available by typing 192.168.1.1 into a web browser address bar and then entering the router username and password at the router logon screen) may offer the option to temporarily switch off 5GHz. You can re-enable it after pairing.
Or
– If your dual-band router only publishes a single SSID, then move the phone as far away as possible from the router whilst still showing a Wifi connection on your phone. Because 2.4GHz is a stronger signal than 5GHz, moving the phone away from the router should force the router to offer you the 2.4GHz connection.
Try pairing again using the procedure in the manual.
If this still does not work, then you should try the Alternative Pairing “AP Mode” offered by the Smart Life app. This mode forces both your phone and Thermostat to be on the same network and should be used in situations where many signals may be available (or if you are moving the controls from one network to another).
– Click the + sign in the Smart Life Home screen to add a new device.
– Select “Small Home Appliances” and then “Wifi Thermostat” as you did before.
– Select “Other Mode” in the top right of the screen and select “AP Mode”.
– Disconnect your thermostat from the power for 10 seconds then reconnect it.
– Work through the instructions for pairing your specific controller. Be sure to press the pairing button on the controller until you get a slowly flashing pairing indicator.
– Confirm to the App that the pairing indicator is blinking slowly. Then choose the network and password for your home router and click “Confirm”. When you do this, Smart Life will switch to your Phone’s network connections and show “SMARTLIFE” as an available connection. Select this option and connect to it. What this step does is to connect the phone direct to your thermostat and pass the network login details direct to the thermostat. This allows your thermostat to get onto the correct network. Once connected, use the back keys to get back to the Smart Life App. The App will then disconnect from the thermostat and reconnect to your home network where it will re-commence a discovery where it will now find the thermostat as it is now definitely connected to your home network.
– Your thermostat should now appear in the Home screen of your app.
If you continue to have trouble, please raise a support ticket.
Herschel’s Thermostats (except for the T-BT which doesn’t have wifi) work via the Smart Life App with Alexa and Google Home via voice command and via a very simple management widget in Alexa and Google Home Devices control panels. Commands in Alexa and Google Home are limited to temperature up & down commands and thermostat On / OFF commands.
Discovery of Herschel thermostats by Alexa and Google Home is automatic, once the two services are correctly linked to your Smart Life App following the instructions below. It is not possible to manage your Herschel thermostats via Alexa or Google Home without the Smart Life App. Discovery occurs in the cloud, not on your home network and also means you can manage your devices via Alexa or Google Home when you are not on your home network.
For Alexa and Google Home control, you do not need a local Alexa or Google device (e.g. like an Echo Dot or Google Home Hub) to run the commands for you: you just need the app. However you will need to enable voice control from the Alexa App and you will need Google Assistant for Google Home to run the voice commands.
How to pair
In Alexa, select “More” and then “Skills and Games”.
Type “Smart Life” into the search bar, selet Smart Life from the list and then “Launch” Smart Life. Select The App and a local Home device (like an Echo Dot) and launch. When prompted also selet the ability to control Alexa by your voice on the App.
In Google Home, Select “Add a device” and then “Works with Google Home” and select Smart Life from the list. Once you select it, you will have to authenticate Smart Life with your Google account. Note in order to control Google Home on your App using voice commands, you will also need to install Google Assistant and the two will then interoperate. For Alexa, make sure you enable voice commands on the Alexa app.
Back in Smart life, find the “Me” option (bottom right hand icon) and then select Alexa or Google in “Third-Party Services” as shown below.
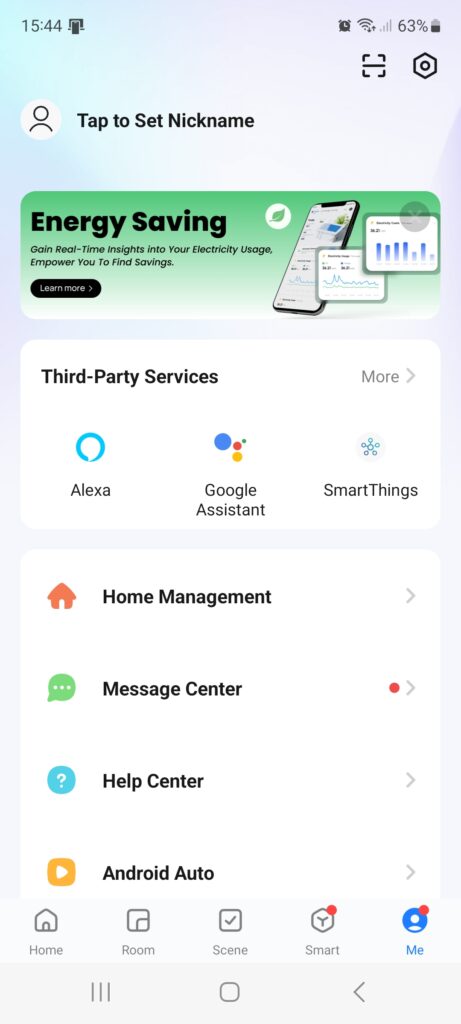
When you click into either Google Home or Alexa, you will see a screen similar to the following (different title if it is Google Home rather than Alexa, but same icons below).
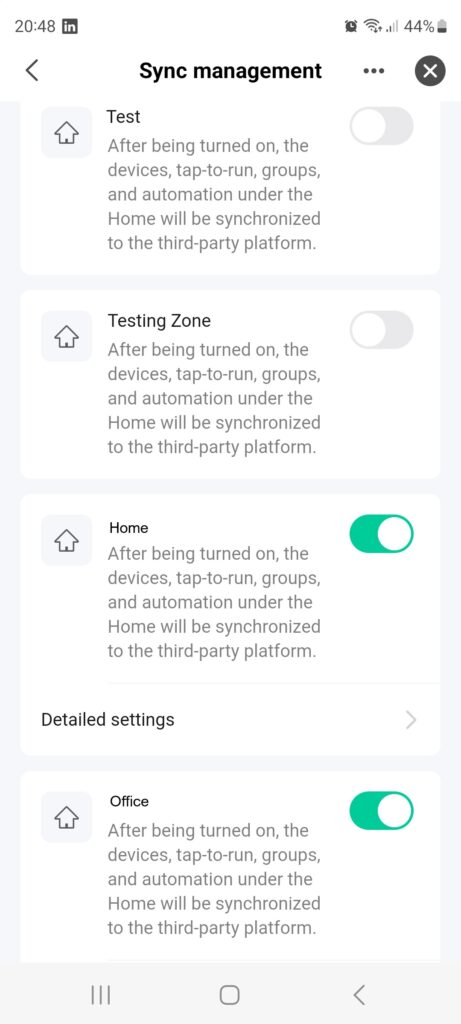
You should check your “Synch Management” settings. This is important, since every “Home” you have defined in Smart Life will try to synch with Alexa and Google Home. So this feature cuts down the number of “Homes” (e.g. your office; your home etc) that will replicate to Google and Alexa. If you do not check these permissions, it is possible none of your devices may synch (i.e. all Homes are “OFF”) or all of them will (all Homes are “ON”).
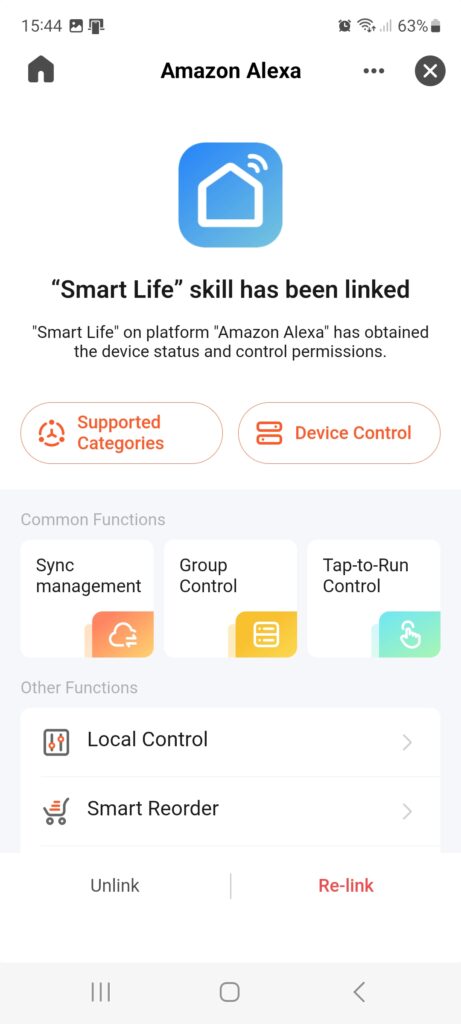
“Device Control” if you click it, will also be initially ordered by “Home” but if you then drill down to the individual Smart Life devices in each Home, you will be able to see the supported functions in Alexa or Google Home.
Re-Link is another feature worth highlighting at this point as being useful if you need to re-link and re-authenticate at a later stage for whatever reason.
Once linked you will be able to control your thermostats with basic temperature increase and decrease commands as well as thermostat “ON” and “OFF” commands.
Troubleshooting
Alexa and Google Home do not work with Herschel Thermostats independently of Smart Life. Thermostats must be paired successfully with Smart Life and all normal local wifi conditions (good 2.4GHz wifi signal; router doesn’t have too many simultaneous wifi connections) must also prevail to also be able to manage the thermostats in Alexa or Google Home.
Make sure Alexa or Google Home have been properly connected and authenticated with Smart Life using the steps above.
Just occasionally, if you have added a device and it is not showing up on Google Home (we haven’t yet seen this with Alexa), then force-close the Google Home app and reboot your phone.
Very rarely it is possible a firmware update may be available for your thermostat and it is possible this may block 3rd party features until it is applied, but if you set devices to auto-update (in each device, select Settings (pencil icon to the right of the device name) => Device Update (right at the bottom of the next screen) then toggle Auto Upgrade ON, then this should never be a problem.
Very rarely too, one of Smart Life, Amazon or Google Home cloud servers can run slowly and service may occasionally degrade, but this is only ever temporary.
Smart Life Scenes
This scene works with all Herschel App-Enabled thermostats using Smartlife and our PIR Sensor.
Notes:
- Always create two scenes for the PIR sensor: one to take action when the room is unoccupied, the other to take action when the room is occupied. This will help ensure your heating is not left in an uncertain state.
- As shown in the video, when the PIR sensor detects “No occupancy” we recommend you add a delay of 5 – 10 minutes before reducing the temperature. This will help ensure the lack of occupancy is deliberate (i.e. someone has gone out) rather than temporary (just left to boil a kettle). No delay is needed when someone comes back into a room: you can turn the temperature back up immediately.
Our thermostats come with configurable Schedules that run under Smart Mode using the Smart Life app. These work well, but work thermostat by thermostat.
If you want to create one schedule to run all the thermostats in your house then creating a Schedule Scene is a much easier way to do this. This video shows you how.
Create a “One Touch” scene that will turn all your thermostats down to a setback temperature while you are away for a period of time.
Unable to find what you’re looking for? Please contact our technical support team using the form below and they will be able to provide further assistance.