
We are the UK Infrared Experts and are here to help
Here you’ll find answers to some of the most common questions about all types of infrared heating systems. If you cannot find the answer you are looking for, please contact us, or simply use the Chat to leave a message, and one of our experts will answer your question as quickly as possible.
For after-sales support questions, please check our Help Centre where you will find answers to our most frequently asked support questions and the ability to raise a support ticket.
"Where can I...?"
Outdoor heaters are becoming increasingly popular, but there are many different types of heater available and lots of jargon.
But even on the nicest of days in the UK it very often gets chilly or cold in the evening and if you want to enjoy socialising outside, outdoor heating is a must.
So we’ve put this handy guide together to help you chose the right heater for you and answer the most commonly asked questions.
We provide a comprehensive installation service, delivered either by our expert in-house installation team or through our extensive, UK wide installer network. Contact Herschel on our “Find UK Installers” page to get an installer near you.
If you want to become a Herschel installer, you can also apply from this page.
You can even recommend your own electrician.
Please contact Herschel to find your closest showroom.
There is no need to register the warranty. In the event of a problem, please contact our Support team via the website with the date and proof of purchase (details of which will be available on your order confirmation and invoice) and they will be able to assist.
We also offer a 5 year Extended Warranty when purchasing our Comfort and Select XLS heating ranges. More details are on this link.
Thank you for ordering from Herschel Infrared.
If you ordered from us online, then you can enter either your order number and email or the tracking number you were sent to track your delivery here.
Quality & Safety
Herschel panels are tested and verified by the German research establishment TÜV and the tests include verification (Geprufte Sicherheit – or “Proven Safety and Health”) and Electromagnetic compatibility with current world standards for human health and electrical appliances. They are also RoHS and REACH and EcoDesign (Lot 20) Compliant. Our thermostats are tested to be free of radio interference.
Click here for more detailed information.
Herschel Infrared heaters come with a 5 or 10 year guarantee. Our Inspire range is designed to last decades because of the high quality of materials and advanced heating elements that are used. Herschel Far Infrared panel heaters require no maintenance or servicing. Our heaters use solid state elements unlike water-based heating or fan-assisted systems, which often require servicing, inspection and repair costs. And unlike gas or oil boilers you won’t have to contemplate performing an entire re-installation every 10 years.
Herschel Infrared heaters and control products are certified to national safety standards.
IEC 60675-2:2021 which covers household direct acting room heaters provides a standard for assessing their radiant performance. It is the internationally agreed legal definition of the performance criteria for radiant performance of household electrical heaters.
The standard states:
- Anything with a surface temperature of less than 40c cannot be classed as a radiant heater;
- A heater with a surface temperature between 40c – 200c may fall into the category of “low temperature” radiant heater but only if when tested the radiant efficiency is greater than 40%
- Heaters with a minimum surface temperature rise of 75c can be classed as a “radiant” (infrared) heater and can still submit for testing to establish exactly its efficiency %. As a guideline Herschel panels demonstrate 70% or greater radiant efficiency – meaning more than 70% of their output power is observable as radiant (as opposed to convective) heat.
Heating films embedded in building materials and wall papers are out of scope of IEC 60675 because at best they reach only 40C (the threshold for considering a heater in scope for radiant effectiveness assesment) and will not reach the 40% radiant efficiency output measure.
Herschel Infrared panels have surface temps of approx. 95-100c. At this level the radiation effectiveness is in excess of 70%, so at least 70% of the heat is output as radiant (far-infrared) heat. Under IEC60675 this would be rated as “high radiation effectiveness”.
As a result Herschel is able to represent our heaters in the market as radiant (infrared) heaters. There are many companies now supplying heaters that are at or below 40C and calling themselves radiant, but this is a misrepresentation.
The BEIS commissioned the Cost-Optimal Domestic Electrification (CODE) report from 2021 which covers infrared-red radiant panels with a 70% radiant fraction stated as per the IES modelling system.
European Far Infrared Panel Consortium:
IG Infrared https://www.ig-infrared.com/en/home.html is the EU Infrared manufacturers trade association defines the standards for Far Infrared panels in Europe as:
- A flat surface panel with an operating temperature of at least 75°C or more.
- An emission rate of least 0.09 watts per centimetre2 over the panel surface.
- Must have CE, Electrical Safety, Electrical Emissions, Safe Construction and Intelligent Controls certification.
These are all infrared panel heaters as per the type described in the BEIS reports.
Please also refer to:
Longest track record
At Herschel we have the most extensive experience of the application of Far Infrared in the UK (check our Residential and Commercial Case Study pages). Effective heating is all about matching the right heater to the right requirement and we have many years experience in this: helping us develop not only our estimating models, but also driving product development too.

Best heaters and widest choice and quality
Herschel has developed heaters to provide the best combination of quality, performance and price available. We have the largest range of heaters available for the widest range of applications. All of our heaters have been extensively tested to UK and International standards and carry best in class warranties. We are the number one UK infrared manufacturer and supplier and also distribute our heaters globally, across Europe, North America and the Southern hemisphere.
Integrity
Integrity is one of our core values and we will never allow our heaters to be mis-specified or mis-sold. You can be sure that when you purchase a Herschel heater you will be purchasing the right heater for the right application and will have many happy years of use. Key benefits:
- Free delivery to UK and mainland Europe for online purchases;
- No need to register your warranty if you buy direct from us;
- No quibbles replacement of qualifying warranty claims;
- Access to Herschel technical support.
Please also see FAQs on What quality standards are Herschel panels tested to? and Are there any standards on Far Infrared panel performance?
There have been a number of low voltage, very thin, carbon based heating products in the form of “Wallpaper”, in-wall, ceiling or underfloor mats that have recently appeared on the market promoting themselves as “Infrared”, “far infrared” and / or “Radiant” heating technologies. Typically these systems are low voltage (via transformers) heat mats which can be installed to cover a large area within walls, ceilings and floors.
These heating systems reach a maximum of 40°C surface temperature and are usually much cooler once covered with plaster, carpet, paint etc. For the reasons explained below, these systems usually demonstrate a relatively low percentage of radiant (infrared) heat as a proportion of their total power, with most of their heat energy being in the form of convection and conduction. It is therefore misleading to make claims of these systems as being “Infrared” or “Radiant” heating solutions and they cannot be classified as radiant (infrared) heating systems under UK and international electrical standards.
Radiant Heat Transfer
To have radiant (infrared) heat, you must have a distinct temperature difference between the heater and the things it is trying to heat. If two objects are at the same temperature, then no radiant heat (infrared) transfer occurs. If they are at nearly the same temperature, then very little radiant heat (infrared) transfer occurs. The greater the temperature difference between two objects, the more radiant heat (infrared) transfer occurs. The amount of radiant energy transfer as a proportion of the heater’s total power is known as the “Radiant Effectiveness” of a heater and it is a critical determinant of whether a heater can call itself “Infrared” or not.
The following diagram shows the difference in radiant heat (Infrared) transfer between 3 objects: one at 25°C (roughly surface temperature of human skin); 50°C (i.e. central heating radiator) and one at 100°C (i.e. Infrared Heating panel).
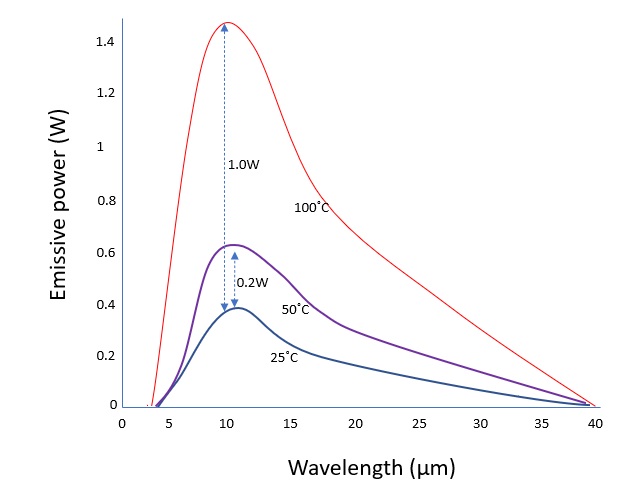 You can see from the diagram that the infrared heat transfer between something at 50°C and another at 25°C is very small: around 0.2 watts per metre. This is barely discernible on the skin as radiant heat and you can easily test this yourself by moving your bare arm closer and closer to a central heating radiator until you can sense the heat. (You almost have to touch it). In other words the “Radiant Effectiveness” of a central heating radiator is going to be small as a proportion of its total power. Most of its energy will be producing convective, not radiant, heat.
Contrast this with an Infrared panel at 100°C and an object at 25°C where the heat transfer is about 1 watt per metre and easily discernible on the skin up to a couple of metres away from the panel. Radiant Effectivess of an IR panel is consequently high as a proportion of its power and is the reason why these heaters are classified as “Infrared”.
Heater Temperature, Surface Area and Power
The ratio between the surface area of a heater and its power is important in defining the heater temperature. More watts per area of surface = more temperature (= more infrared heat).
Infrared heating panels require between 900 – 1000 watts /m2 surface area to produce between 90 – 100°C panel temperatures (to be able to transmit infrared heat effectively per the above chart).
Infrared Wallpaper requires approximately 200 watts / m2 to produce a maximum of 40°C surface temperature. (Whilst lower energy per m2, the low resulting temperature does not produce effective infrared heat transfer per the above chart).
In our view, at this low power : surface area and low resulting temperature, there is little radiated heat transfer from the wallpaper and by being in direct contact with the walls and ceilings, all the wallpaper is doing is slowing down their rate of heat loss by conduction. (Indeed suppliers urge you not to place it on outside walls at all). Otherwise at 40°C, it is otherwise just warming the air in the room.
We don’t dismiss that this might be effective in some way if you cover enough of your walls and ceilings with it. However, at 40°C and 200W/m2 Electric Infrared Wallpaper cannot claim to be radiant (i.e Infrared) and claim the benefits that infrared heating panels have over convection heaters.
International Performance Standards
The international (IEC) standard for performance of household radiators classifies heated wallpapers (or any heater at or below 40°C) out of scope for radiant performance assessment. This is for the reasons described above and shown very clearly by the chart: there is too little transmissiveness of radiant heat as a proportion of the total power consumption to allow the heaters to claim they are radiant (as opposed to convective or conductive).
IG Infrared https://www.ig-infrared.com/en/home.html is the EU Infrared manufacturers trade association and defines infrared heaters as requiring a minimum surface temperature of 75°C and a minimum watts coverage over the panel surface of 900 watts/m2 to qualify as “Infrared Heaters”. (Wallpaper temperatures are a maximum 40°C and watts coverage is 200w/m2 and would not qualify on either requirement).
In the UK, the BEIS is also laying down the performance markers for Infrared panel performance along IEC lines, in two recently commissioned reports defining infrared panels as having 70% radiant efficiency and 80°C temperature. See:
Cost-Optimal Domestic Electrification (CODE) report from 2021
https://www.gov.uk/government/publications/cost-optimal-domestic-electrification-code which covers infrared-red radiant panels (page 41) and
Research paper no: 2019/021
https://assets.publishing.service.gov.uk/government/uploads/system/uploads/attachment_data/file/831079/Electric_heating_options_in_off-gas_grid_homes.pdf page 15.
We have had a number of customers who have installed this type of heating say it has not lived up to expectations and have switched to our infrared heating panels.
See also:
Are Infrared rays safe for people?
 Far infrared heating is 100% safe and natural for our bodies, and our well-being, as the human body is designed to accept and emit infrared. The feeling of warmth from infrared is particularly comfortable. It is UV that is harmful, not infrared, and so there is no need to worry.
 The water in our skin responds well to this particular wavelength of heat which is why it is also called the “Vital Range” of heat. This is why Infrared heaters feel so comfortable. Far Infrared rays are the same heat you would feel off a sandy beach or rocks warmed up in the sun.
People feeling an infrared heater for the first time say it is like walking past a window that the sun is shining through.
Is Infrared harmful at all?
![]() The International Commission for Non-Ionising Radiation Protection (ICNIRP) has conducted numerous investigations into the health effects of different types of Infrared and is the resource that national bodies like the UK Health & Safety Executive refer to when setting safe working conditions. The ICNIRP concludes that for known artificial sources of Far Infrared, the “contribution made by the IR-C spectral region 3-1000µ is normally of no practical concern from a health hazard standpoint”.
The International Commission for Non-Ionising Radiation Protection (ICNIRP) has conducted numerous investigations into the health effects of different types of Infrared and is the resource that national bodies like the UK Health & Safety Executive refer to when setting safe working conditions. The ICNIRP concludes that for known artificial sources of Far Infrared, the “contribution made by the IR-C spectral region 3-1000µ is normally of no practical concern from a health hazard standpoint”.
Do Infrared heaters emit Ultraviolet? Are there any health risks?
 Although often compared to the “heat of the sun” Far Infrared panels do not emit ultraviolet. Ultraviolet is on the “high energy” side of the Electromagnetic spectrum and is associated with the harmful effects of exposure to the sun. At the opposite end of the spectrum, infrared is on the “low energy” side of the Electromagnetic spectrum and does not have any of the harmful characteristics of Ultraviolet. Far infrared, the gentlest form of infrared, is often used in incubators for babies.
Do infrared panels emit EMF (Electromagnetic Fields)?
 Although the Infrared is generated electrically, all Herschel Infrared panels are also tested during certification and certified as “Low Electrosmog” appliances, falling within the lowest category of EMF output . They are also certified as having no radio interference or interference with other control devices (like remote controls) that use IR.
All electronic devices emit electro-magnetic fields in varying levels and collectively this effect is referred-to as “Electrosmog”.
All devices are therefore also subject to regulations governing the amount of acceptable EMF they can produce and reputable manufacturers in Europe are required to adhere to those regulations as part of their CE declaration.
Herschel products operate well within current safety guidelines and standards relating to EMF.
Herschel is also satisfied these standards are regularly scrutinised and updated in light of new research findings in developing technologies, best practice in the industry and legal requirements of health and safety.
Are Infrared Panels Safe to touch?
There is a risk of injury from touching any form of heater and Herschel infrared panels are no different. However, a key benefit of Herschel panels, unlike conventional heaters, is that they can be mounted higher up on walls or ceilings – reducing the likelihood of accidentally touching them or falling against them. We always advise this, especially in areas where young children or the elderly are present.
Our Herschel Inspire and Select panel heaters (excluding Krystal and our Herschel space heating ranges) have surface temperatures of 85 – 95 degrees centigrade. If you do touch one of these panels you will perceive this as hot on initial contact but, provided you do not continue to touch the panel, are unlikely to scald or burn.
The reason that you can touch Herschel panels without immediately injuring yourself is because a Herschel infrared panel typically has a heat energy or “watt density” of 0.09 watts per cm2 – an energy level that the skin can absorb and conduct away from the area of contact.
It is not the temperature that does the damage but the heat energy in the object.
A kettle, for example, typically has a watt density of between 15 – 30 watts per cm2. The skin cannot absorb and conduct away this level of energy and consequently scalds on the area of contact. Yet, both the Herschel IR panel and the kettle are close to 100C.
Warning: Please note that prolonged contact with any heater, Herschel included, will result in injury. Please also note that the Herschel IR space heating range (Advantage, Aspect and IPR4) all utilise Ceramic elements which run at far higher temperatures and would cause immediate injury if touched. Similarly, the Krystal range and all other space heaters must not be touched. These heaters must always be mounted in accordance with our instructions & never be touched when switched on or for 30 minutes after use.
Installation Questions
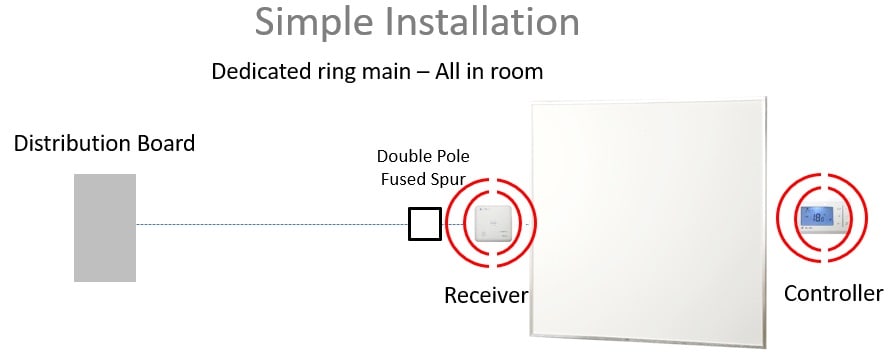
Simple installation schematic – one panel, one controller, single room
For simple panel installations using either the Herschel iQ system or the XLS control system, our recommendation is to make the control receiver attachment after the fused spur. (When using MD2 Hard wired thermostat, the wiring connection to and from the controller should be made here too).
The actual temperature controller itself should be placed where it can measure a sensible average temperature in the room.
For the iQ Control system only, it is possible to make a wiring connection for the controller before the fused spur, but this applies only if the R2 receiver is being commanded by a T2 controller, or when an MD2 controller is being used and applies mainly for multiple panel / more complex scenarios. In all other simple configurations, the Receiver should be wired after the fused spur.
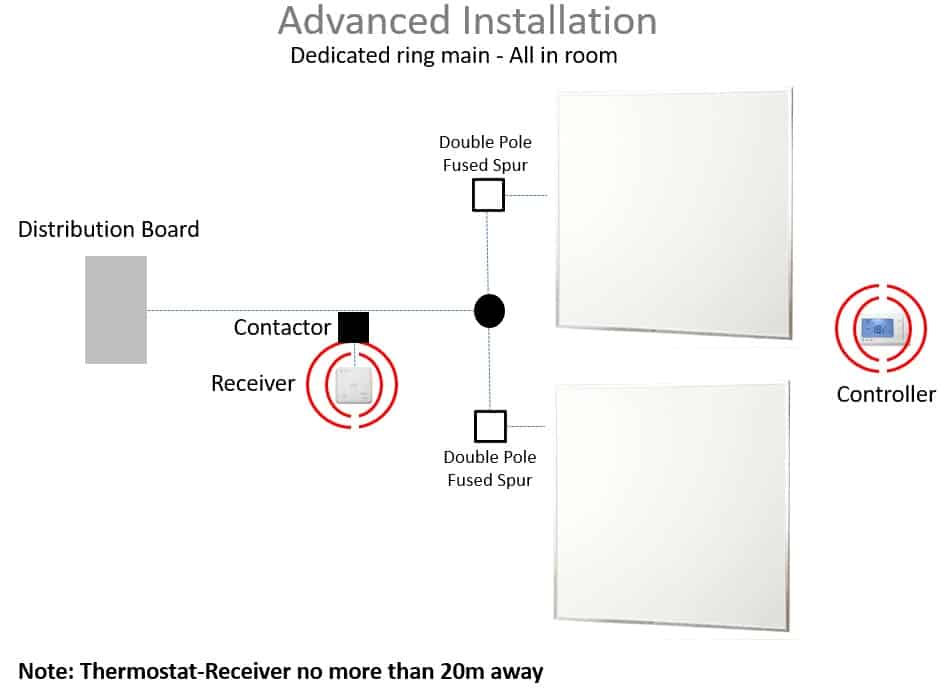
Advanced installation schematic – multiple panels, single controller, single room
This scenario does not apply to Herschel Select XLS panels with their built-in Smart-R receivers. These panels would all be installed on individual fused spurs and a single XLS Thermostat can be placed in the room where it can measure a sensible average temperature. The XLS controllers all draw power independently from the panels.
However, the below schematic represents a very common scenario for Herschel iQ controllers operating either the Inspire panel range or Herschel space heaters.
In this scenario multiple heaters are required to be switched from a single herschel iQ controller in one room. Because it is possible that the heating load will exceed the amperage of the R2 (10 Amps) or MD2 (16 Amps) then a suitably rated contactor must be used to handle the total heating load and the Herschel R2 receiver or MD2 Hard-wired thermostat would be used to switch the contactor before the individual spurs to the heaters.
The actual temperature controller itself (T2 or MD2) should be placed where it can measure a sensible average temperature in the room.
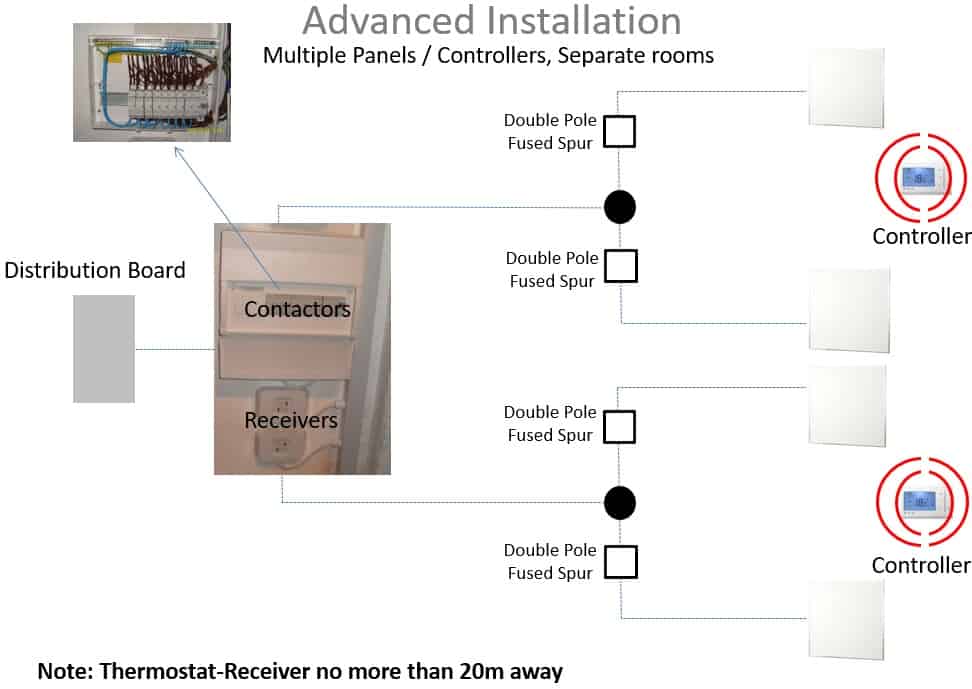
Advanced installation schematic – multiple panels, multiple controllers, different rooms
This scenario does not apply to Herschel Select XLS panels with their built-in Smart-R receivers. These panels would all be installed on individual fused spurs and the XLS Thermostats can be placed in each room where they can measure a sensible average temperature. The XLS controllers all draw power independently from the panels.
However, the below schematic represents a common scenario for Herschel iQ controllers operating either the Inspire panel range or Herschel space heaters in multiple combinations in separate rooms.
In this scenario the heating load for each room would be controlled via a suitably rated contactor controlled by the Herschel R2 receiver or the MD2 hard-wired thermostat for each room. The heaters would still be placed on individual fused spurs in each room.
The actual temperature controller itself (T2 or MD2) should be placed where it can measure a sensible average temperature in each room.
Please visit our Customer Service section to get new copies.
This is an example of a customer install of ceiling-mounted Select XLS panels hard wired to, and powered from, the T-MD2 thermostat. The T-MD2 is also wired to the mains.
•There is a fused spur at low level below the T-MD2 thermostat for isolating the heaters and thermostat.
•The heater cable is connected to mains power and extended with a Wago connector with the connections made in the ceiling void then into the thermostat.
•Any fixed wiring outside the heater coming into contact or close proximity to the heater, must be protected by sleeving with a temperature rating of at least 90°c.
•All cabling behind the appliance must take the shortest route to the edge of the heater. Ensure that the power cable is not coiled. Shorten the power cable if possible and do not place excess cable on the rear of the heater.
•Electrical connections must not be made behind the heater regardless of wall or ceiling-mounting position.
•Ensure no electrical connections are made or fused spurs placed directly behind the heater. These must be made a minimum of 200mm from the edge of the heater.
•Ensure the fixings used for heaters can hold their weight and use joists where possible.
•Cutting the plug off the heaters to hard wire them will not invalidate the warranty.
•Please refer to all other instructions in the Herschel installation guides.


Very occasionally we get asked about decorating problems that show up around heaters and whether the heaters are to blame. However on the rare occasion that we do, in all cases there are underlying problems which the heater – in fact, any heater – is just accelerating or making evident by simple virtue of it doing its job (heating). In all cases, the underlying problem lies elsewhere and will still need to be addressed.
Here are problems we are aware of:
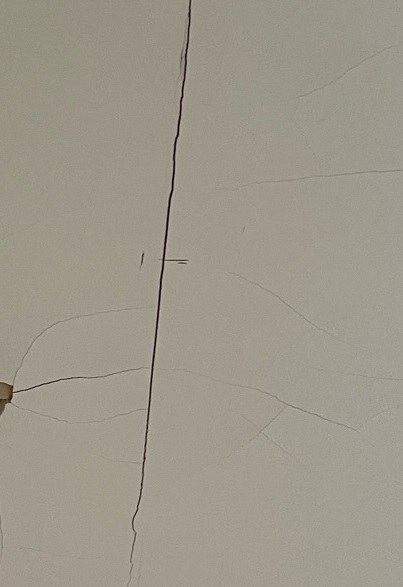
Black marks above the heater
![]() Black marks appearing above a heater is a phenomenon called “Thermal Tracking” or “ghosting”.
Black marks appearing above a heater is a phenomenon called “Thermal Tracking” or “ghosting”.
This problem, while unsightly, is not caused by the heater, although it is exposed or accelerated by the heater.
The problem is the result of airborne particles, usually in damp environments, clumping together and convecting up behind the heater, before condensing on the colder surfaces above the heaters.
These particles can be anything from soot or fumes from ovens or stoves, candles, cigarettes, log burners, car exhaust fumes from the street or even incense sticks.
In cases where the walls are also damp, the particles can also be due to the formation of mould in paintwork or wallpaper on the warmer thermal “tracks” that exist above the heater.
The problem tends to be worse in draughty houses and damp atmospheres.
How to fix it:
You should seek professional advice from a builder or decorator. However in general the following steps can be taken.
Depending on the surface of the wall, the black marks can be cleaned regularly and this can reduce the unsightliness of the marks but will not remove their cause.
In bad cases, the wall should be thoroughly cleaned and preferably insulated before a non water-based paint is applied to the wall.
Prevent the sources of draughts in the house.
Reduce condensation levels in the house by the use of extractor fans in bathrooms and de-humidifiers in other rooms.
In cases of thermal tracking, moving the heater to a different location in the room may not fix the issue, just move it to another spot.
Peeling Wallpaper
 Wallpaper may peel behind a radiator for any of the following reasons. Like the above problem, the heater is not the cause of the underlying problem, but will certainly expose it very quickly.
Wallpaper which is damp will peel away very quickly, usually starting at the seam of the paper where its adherence will be weakest. Wallpaper can be damp for a number of reasons, chief amongst which is condensation. You should never cover your Herschel Infrared heaters, but clothes placed on other radiators to dry is another common cause of damp wallpaper then cracking around the heater.
Poor surface preparation is another common cause of wallpaper peeling, as the paste is unable to make a proper bond with the surface underneath.
Water-based paste or paste of insufficient strength (wrong mixture) is another reason the wallpaper may peel away under the effects of heat, especially if the room itself is damp.
“Papering over cracks” is a phrase with a negative meaning for a good reason. Cracks that have been papered-over can often still breathe and allow the formation of air pockets and blisters underneath the wallpaper which will lift the paper off the wall.
How to fix it:
You should seek professional advice from a builder or decorator. However in general the following steps can be taken.
Avoid placing the heater over wallpaper seams.
Remove sources of damp and condensation in the room. If the room itself is damp, consider using a de-humidifier to absorb the moisture. In bathrooms be sure to use an extractor fan.
Use PVA adhesive to repair small cases where the wallpaper is lifting.
Seek professional decorating advice if the problem is widespread.
Moving the heater to a different location in the room may reduce or eliminate the problem (e.g placed on plasterboard or better prepared surface).
Cracked Plaster
 On the very rare occasions that cracked plaster behind the heaters has been raised as an issue, the only common factors we can point to are:
a) The plasterwork in question has been very recent
b) There is a plasterboard joint behind the heaters
c) The panel is ceiling mounted.
Poor surface preparation, plaster mix, damp board and joists can all be factors in certain cases where problems have been raised, but in these cases you can usually see the cracks elsewhere on the ceiling nowhere near the heater.
How to avoid it:
The characteristics of the heaters themselves are a given: they reach a certain temperature which will dry-out damp and the unit itself is of a certain weight. The cracking plaster in no way represents some sort of malfunctioning of the heater itself. The only steps that would avoid these very rare situations are:
- Avoid placing the heater over plasterboard joints;
- Ensure there is a joist behind the plasterboard that can take the weight of the heater (and not have it suspended only by plasterboard);
- Dry the plaster work as thoroughly as possible before installing and operating the heaters. We have only ever had this problem raised when plaster work is relatively new.
- In most cases, reports are that re-skimming over the affected areas then letting these dry before operating the heater again does solve the problem.
Condensation
 Electric heaters are not a source of water. (Wet central heating radiators however can be if they leak).
Rooms that are damp, are damp for reasons other than the electric heating.
Applying internal insulation (loft, wall cavities) in your home can increase levels of damp and condensation within the home. Applying external wall insulation tends to decrease levels of damp and condensation.
Infrared heaters have a drying effect on objects because they warm surfaces which tends to discourage condensation and keep the moisture in the air.
However, moist air will still try to condense on cold surfaces unless it is removed, either by extractor fans (in bathrooms), loft vents or de-humidifiers.
Allowing condensation to develop in a room can have many consequences, such as the two problems above, as well as the formation of mould.
How to fix it:
You should seek professional advice from a builder to determine the sources of damp within your home.
If your home is damp, you need to have means to remove damp air, regardless of your heating system. Usually removal of damp air is performed by extractor fans, loft vents and de-humidifiers.
Seek the advice from a professional decorator or builder to remove long term effects of damp in a house (such as mould, wood rot, peeling wallpaper or flaking paint).
Herschel Infrared panels can be installed on the wall or ceiling, the optimal placement of the infrared heaters depends on several factors, such as the size of the room, the layout of the building, the intended use of the room, and the type of heater being used. Our sales team will be able to help you choose the best heaters for your space and the optimal placement for these.
Some panels, such as our Picture, and Mirror panels cannot be installed on the ceiling, however as infrared heats people and object directly, the level of comfort will be the same regardless of whether the panels are installed on the wall or ceiling. To calculate the amount of wattage would be needed for your space, you can contact our sales team, or alternatively, can use our online calculator.
Herschel panels radiate far infrared heat through the air which is then absorbed by objects and surfaces of the room. The most effective place for you to mount your panels is usually higher up on the walls or on the ceiling.
The heaters will be less effective if they are mounted directly opposite a window or door as there will be no thermal mass to absorb the energy.
You will feel heat from the panels to a distance of around 2.5-3m, so if you want to have the feeling of the warmth from the panels try to mount them within 3m of where you are normally located within the room.
We recommend you contacting us or one of our authorised distributors, installers or re-sellers for more advice.
Infrared heating panels from Herschel are easy to install with several installation options to choose between. Our Comfort and Inspire panels should be professionally installed and qualified electricians just need the provision of electricity and space to mount the panel heater. Installation guidelines are available on the website. Herschel also offers a range of Select XLS infrared panels that all come with the EASYFIX mounting system allowing for simple wall-mounting (and plug in to a mains socket) by keen DIY-ers. The Select XLS infrared panel range can also be professionally installed on a ceiling using a qualified electrician, requiring standard electrical not specialist skills, for a quick install. Optional feet are also available for purchase should a freestanding option be preferred for those seeking a no-install option for Herschel Infrared panel heaters.
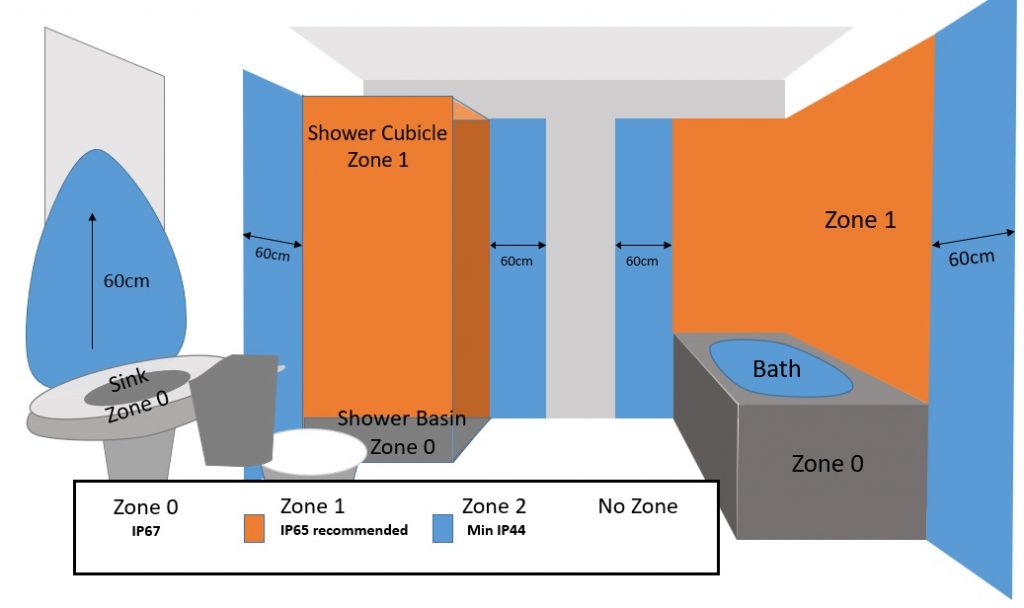
Electrical Safety in bathrooms divides into four zones.
In Zone ‘0’ which defines being within in the sink bowl, bath tub or shower bowl any electrical appliance must be IP67 (full immersion capable) and low voltage.
Zone 1 is the splash zone above a bath or within a shower enclosure and extends from the floor to 2.25m up the walls. For a wet room (no shower cubicle and no foot bowl) Zone 1 extends 1.2m either side from the shower source and 2.25m upwards from the floor. Any electric appliance operated in this zone must have a 3 ma RCD protection on the circuit and IP65 or above is recommended. Note however the space above 2.25m is “No zone” and so an IP44 Infrared panel heater can be placed above these zones e.g. on the ceiling so long as this is more than 2.25m from the floor above a Zone 1.
Zone 2 is a safe zone with a 60cm radius outside any Zone 1, to which the IP44 minimum rule applies.
“No Zone” is any other area in which theoretically no ingress protection need be applied.
All electrical appliances in a bathroom should be protected with a 30 ma RCD (Residual Current Device).
This means that any Herschel panel heater may be installed above zones 1 and can be installed within Zone 2 or “No zone”. If you are seeking to install an Advantage or Aspect space heater, please seek the advice of your Herschel Installer, since IP ratings vary.
To allow the panels to operate at the right temperature and unobstructed, our Instructions call for no objects to be placed within 400mm of the front of the panel and not within 200mm of the sides of the panel. This includes if you are intending to flush-mount panels in a plastered ceiling where you must still leave 200mm around the sides of the panel which is necessary to allow you to mount or dismount the panel easily, but ensures the panel will operate at the correct temperature. The limitation does not apply to heaters being placed in a ceiling grid where the heater has to fit into the grid and therefore touch the structure of the grid. However we would still advise you not to place two heaters next to each other in a grid.
However, in practical terms, you don’t want to position a far infrared panel where objects and furniture will obstruct their radiant effect. Panels should be sited to maximise the throw and spread of the far infrared heat without obstruction. The panels radiate heat in all directions and any obstructions will interfere with the performance of the panels. Furniture should not be placed directly in the path of the panel. For example, if the panel was sited on a wall ABOVE a sofa this would warm the room and the sofa and would be working effectively, However, if the panel was located low down behind the sofa, the panel would heat the back of the sofa and not the room and would NOT work effectively. This is very different to conventional “radiators” which heat the air and are often sited behind furniture.
For our more powerful space heaters, please consult the instructions, as distances vary with each heater. We also advise that it should not be possible for materials such as curtains to blow onto the space heaters and to adhere to the minimum mounting heights of these units recommended in the instructions.
The wires can be chased into the wall and completely hidden or else discretely fitted within cable trunking, in much the same way as you would do when installing any electrical device (i.e. a wall mounted flatscreen TV). Please consult your electrician or a Herschel Accredited installer for more advice.
Controls Questions
Our XLS and iQ ranges work slightly differently from each other but in summary it is possible to pair multiple panels to one thermostat, as follows:
Herschel Select XLS Range
T-MT, T-BT, T-PL
You can pair multiple Heater Panels to a single thermostat using the standard pairing procedure on the panel instructions.
Herschel iQ Range
MD2, T-MKS, T-MKW
Up to 16 amps of heater load can be directly wired through the MD2. If the overall heater load to be controlled by the MD2 exceeds 16 amps, then an appropriately sized contactor must be used to handle the heater load and the MD2 just switches the contactor.
T2/R2
Multiple R2s can be paired with a T2.
Up to 10 amps of heater load can be directly wired to an R2.
Where overall heater load exceeds 10 amps, you could use a contactor (as MD2 above), but it is probably more pragmatic to use multiple R2s and just pair these to the T2.
Full pairing instructions for the XLS thermostats come packed with each XLS thermostat and XLS heating panel.
The web pages for each of the thermostats also contain the downloadable set of instructions.
We have made this short video to show you how simple pairing is.
If you need further help, check out our detailed thermostat help guides here.
Our thermostats come with configurable Schedules that run under Smart Mode using the Smart Life app. These work well, but work thermostat by thermostat.
If you want to create one schedule to run all the thermostats in your house then creating a Schedule Scene is a much easier way to do this. This video shows you how.
Herschel’s battery-powered thermostats, the T-BT and T2 should give you a full heating season’s operation on a fresh set of 1.5V alkaline batteries.
However, power consumption of the unit will increase and battery life will shorten if the thermostat is not in good RF contact with the receiver (T2 pairs to R2 and T-BT pairs to the Smart-R receiver). If RF contact is poor, the thermostat will spend a lot of its time (and power) trying to acquire the receiver it is paired to. In tests, we found this can be up to x4 the normal consumption of the unit. Examples of poor RF contact could be due to:
– The receiver is too far away from the thermostat or the RF signal is blocked for some reason (electronic or physical interference): for example this can happen if the R2 has been installed in a cupboard or ceiling void;
– The receiver and heater have been switched off from the mains but the thermostat has been left on.
We also advise you use good quality 1.5V alkaline batteries. Do not use rechargeables unless they are 1.5V.
No, our thermostats can control multiple panels. We advise one controller per room and each controller can control one or multiple panels. Please check respective thermostat instruction guides for more information.
Full pairing instructions for the T2/R2 thermostat pack come packed with the T2.
The web page for the T2 also has a downloadable set of instructions.
We have made this short video to show you how simple pairing is. If you need further help, check out our detailed thermostat help guides here.
Create a “One Touch” scene that will turn all your thermostats down to a setback temperature while you are away for a period of time.
(Note: T-BT is not Wifi Enabled and therefore cannot pair.)
The root cause of App pairing problems lies in the phone and the thermostat failing to connect successfully to the same 2.4GHz local wifi network.
The ideal pairing location would have just a single 2.4GHz wifi network with no network extenders or other available network connections. However, many homes and offices have multiple available networks, hotspots and network extenders offering 2.4 & 5GHz connections; not to mention “Wifi Assist” on your mobile trying to switch you over to 4G; strong signals from neighbours houses etc. So very often it is possible your phone may be on one network (which may not even be your home network), whilst the Thermostat itself initially has no idea which network to connect-to out of the many choices it may be offered.
So we need to get the Mobile App and Thermostat on the same 2.4Ghz network in order to pair.
1. If you are getting a message “Device Not Found” after attempting pairing, perform this step first, otherwise go to Step 2 below.
If you are getting “Device Not Found” and only have a single network then ensure the controller is as close as possible to the router during pairing. Then attempt to pair using the procedures in the installation manual. Once you have paired successfully, move the controller to its intended location. Please note though, like any wifi device, if the thermostat is outside the network range of your router, you will not be able to manage it via the app. You cannot manage a wireless thermostat on a network extender (where attached devices are just “guests”. The thermostat and app both need to be paired and operated on the main network.
2. For all other failure messages found during pairing, please perform the following steps.
– If you have an Apple IoS phone with “Wifi Assist”, please disable it before proceeding. (You can re-enable it after pairing is complete). This will keep you on your home wifi networks.
– If your router is “Dual Band”, i.e. it offers both 2.4GHz and 5GHz signals, check and amend the following:
Either
– In the connection settings on your phone, your router may publish two SSIDs: one marked including the numbers 24; one marked including the number 5. Please be sure to connect to the option with the numbers 24.
Or
– Your router settings (usually available by typing 192.168.1.1 into a web browser address bar and then entering the router username and password at the router logon screen) may offer the option to temporarily switch off 5GHz. You can re-enable it after pairing.
Or
– If your dual-band router only publishes a single SSID, then move the phone as far away as possible from the router whilst still showing a Wifi connection on your phone. Because 2.4GHz is a stronger signal than 5GHz, moving the phone away from the router should force the router to offer you the 2.4GHz connection.
Try pairing again using the procedure in the manual.
If this still does not work, then you should try the Alternative Pairing “AP Mode” offered by the Smart Life app. This mode forces both your phone and Thermostat to be on the same network and should be used in situations where many signals may be available (or if you are moving the controls from one network to another).
– Click the + sign in the Smart Life Home screen to add a new device.
– Select “Small Home Appliances” and then “Wifi Thermostat” as you did before.
– Select “Other Mode” in the top right of the screen and select “AP Mode”.
– Disconnect your thermostat from the power for 10 seconds then reconnect it.
– Work through the instructions for pairing your specific controller. Be sure to press the pairing button on the controller until you get a slowly flashing pairing indicator.
– Confirm to the App that the pairing indicator is blinking slowly. Then choose the network and password for your home router and click “Confirm”. When you do this, Smart Life will switch to your Phone’s network connections and show “SMARTLIFE” as an available connection. Select this option and connect to it. What this step does is to connect the phone direct to your thermostat and pass the network login details direct to the thermostat. This allows your thermostat to get onto the correct network. Once connected, use the back keys to get back to the Smart Life App. The App will then disconnect from the thermostat and reconnect to your home network where it will re-commence a discovery where it will now find the thermostat as it is now definitely connected to your home network.
– Your thermostat should now appear in the Home screen of your app.
If you continue to have trouble, please raise a support ticket.
Here are some handy tips to make sure your home network is ready to use Smart Devices.
You don’t want to buy a Smart IoT Device and install it, only to find it does not work, or works sporadically. You can avoid this situation with a few precautionary measures.
1) Ensure your home network actually reaches the parts of your house you are installing your devices in. A Smart Device may struggle to join your network, or may only operate sporadically if it doesn’t have a good signal. Download the Netspot App and use the Inspector to determine the strength of the 2.4GHz signal in each location you want to install a device. (Ignore the 5GHz signal results). You really need a “Green” result in each location to ensure reliable IoT service. If you don’t get a “Green” result, consider implementing a mesh network (essentially network extenders but they interoperate and keep the same SSID and login throughout the house). These devices not only ensure your network will reach the furthest corners of your house using the same network ID, but they also take considerable strain off your router by acting as interim “hubs” for traffic requests.
2) Familiarise yourself with your router’s configuration and check if you can switch the 2.4GHz and 5GHz signals on and off separately. Most IoT devices use 2.4GHz and some require it exclusively during pairing. Unfortunately many ISP-supplied routers don’t always make this choice available -another reason for installing an extender or mesh network, most of which do. Once successfully paired, you can re-enable both signals.
3) Check your subscription bandwidth. You can use Netspot to run a speed test. These days with Fibre optic, bandwidth and quality of service for IoT devices should not be an issue. However some people are not yet lucky enough to have fibre and bandwidth becomes a more contentious resource. The more devices you add; each potentially emitting a couple of hundred bytes a second simultaneously, plus everything else in the house making some sort of bandwidth demand, you run the risk of being network constrained as well as creating bottleneck conditions on the router if your bandwidth is insufficient. Remember IoT devices also communicate both ways, so Upload Bandwidth is important, not just download.
4) Ensure your router firmware is up to date and apply per-device and app updates if these also require updating.
5) Research the App support website for the devices you intend to use and check there are no known incompatibilities between, for example, your router and the app framework you intend to use. These incompatibilities do exist and it is wise to pre-empt any possible issues.
Problems to Look out for:
Difficulty pairing
If you are experiencing difficulty pairing your device to your network, in most cases it will be no clear 2.4GHz signal being available and in rare cases, more than one (so the device does not know which one to connect to – solved usually via the device’s own “alternative pairing mode”.) Be sure the 2.4GHz signal for your network is available for the device and if necessary, stop any 5GHz signal until pairing is complete.
Changes to the App don’t reflect in changes to the device and vice versa.
If the device appears available (i.e. not “offline”) in the App and you are able to make changes in the app, then if the device itself is not updating chances are you have some form of internet or connection issue related with your network. This could be a combination of points 1 to 5 above and you should check through all of them. Is it happening with devices that were also initially hard to pair? Some IoT devices have their network status available in “Device Information” on the App, so check that first. Signal strength of -55dBM is very good. A signal strength of -70dBM or higher is very poor so a device may appear “connected”, but is only partially so and may not function correctly.
“Offline” devices that should be online
Check the device proximity to the network. If the device in all other respects shows it has a strong signal, but still regularly goes offline, check if rebooting your router fixes the issue. If it does, it is a possible sign of router overload and not managing devices actually connected to it, versus those it thinks are. (There are all sorts of reasons why, not in the scope of this article to address). If you have the technical skills, assigning a static IP to the MAC addresses of the IoT devices or assigning a specific DHCP range only to your IoT devices should fix this problem.
New Ecodesign legislation from the EU 2015/1188 (otherwise known as Lot 20) means that re-sellers and installers of electric space heaters will need to be sure that the heaters they are selling or installing comply with Lot 20 from 1 January 2018.
Heaters that fail to comply will not be able to be supplied or installed in EU member states, so it is vital for re-sellers and installers to be aware of the new legislation.
The EU commission has recognised for a number of years that local space heating represents a high proportion of energy usage and therefore is a key area for carbon emission reductions. The new legislation is designed to reduce energy consumption. For electric space heaters, this will be achieved by only permitting their use when operated by advanced controls, improving their effective use and minimising wasted energy.
Herschel Infrared heaters together with either the Herschel iQ or XLS controls are fully compliant with EC Directive 2009/125/EC for Ecodesign of local space heaters. Herschel outlines that these iQ features not only make the product set Lot 20 compliant, but also best in class.
Water Heating Questions
Everything you need to install your HydroNova system comes with the package.
This includes:
- Expansion Tank
- Mixer Unit
- Herschel Smart Switch (HN1). The HydroNova comes with a Herschel Smart Switch, as standard. The Herschel Smart Switch cannot be used alongside a solar diverter. If you are using the HydroNova with a compatible solar power diverter upon install, the Smart Switch accessory will be replaced with an Optimino PV key. Please contact our Logistics team for further assistance. If solar is planned for a future date, the solar PV ready accessory, Optimino key, can be purchased as an additional accessory.
Pipework and pipe connections are not supplied, however your plumber will have these as standard parts.
Herschel has carefully selected brands for their hot water proposition that support the environment and reflect its own values. Innovative designs on all our water heating systems ensures energy consumption is reduced, saving money on bills whilst also protecting the planet.
The innovative technology in the HydroNova system, including Thermino© hot water battery from Sunamp©, does not contain any toxic or hazardous materials and there are no end-of-life disposal issues.
The HydroNova system is maintenance free with no servicing requirements.
HydroNova is controlled with Herschel’s HN1 switch. This switch works with SmartLife and you can therefore set it to run on a schedule (e.g. overnight to use Economy 7) and can opt to add a mid-day top-up charge if you need to.
By Using the HN1 switch, you can integrate management of your hot water into your whole house heating solution on SmartLife.
HN1 comes with your HydroNova purchase, as standard. If you plan to use solar PV upon install, a solar PV ready accessory (the Optimino key) will be sent out instead of the HN1 smart switch. The Optimino key is also available to buy as an accessory if solar is planned at a future date.
HydroNova uses a revolutionary new “Phase Change” technology to provide heat. When the element is charged electrically, the materials in it change “phase” from a liquid into a solid. This “charging” process itself requires very little energy relative to heating an equivalent volume of water in a Immersion Heater.
When cold water is passed through the heat exchanger, the material changes phase back into a liquid. Heat Energy is only released at the is point. So the element – after charging – can remain in solid form for a very long time, without ever releasing any heat at all. This saves additional energy that immersion heaters consume even when they are not used.
The risk of Legionella is managed by both hot water systems. The innovative design of the HydroNova system, including a Thermino© hot water battery from Sunamp©, minimises the risk of Legionella disease.
Orders & Deliveries
Panels are to be signed for ONLY if there is NO damage to the packaging on delivery. If there is any damage to the packaging please do not sign for the goods. Contact Customer Services at Herschel, +44 (0)1473 760059, within 24 hours of receipt to notify us of the problem. Please quote your order number in all correspondence.
There may be delays to the usual delivery timescales over the Christmas period. Please contact us for more details on +44(0)1473 760059.
Extended Warranties are available on our Comfort and Select XLS heating ranges. Our fantastic Extended Warranty product offers an extended 5 year warranty protection, on top of the standard warranty period, offering you that little bit of extra peace of mind on your heaters.
The Extended Warranty will begin on the date the standard warranty expires. The same terms and conditions as your standard warranty will apply (Warranty Policy – Herschel Infrared Ltd).
When purchasing your Comfort and Select XLS heaters, and you’d like to add the Extended Warranty, simply add the ‘Extended Warranty’ product where it is available within the Add to Cart process. Please note that if you are buying more than one model, for example 3 x Comfort 1200W heaters, the cart will automatically add 3 x Comfort Extended Warranty – Comfort 1200W products. The price shown will be for the total number of Extended Warranty products added.
Note that there is no need to register the warranty. All you need is the date and proof of purchase (details of which will be available on your order confirmation and invoice).
Our Inspire heater panels are specially made to order in Germany and will take approximately 4 weeks from order to delivery.
All other heaters are standard stock items, so as long as we receive your order by mid-day on a working day, we should be able to organise dispatch the same day and your panel should be with you within two working days (UK Orders).
For orders placed in the UK from Europe, delivery times may take a little longer.
You can track the status of your deliveries here.
You will be advised at the time of ordering if there are any changes to our standard lead times.
Cut-off time for next day delivery is 12pm (excluding weekends, weekdays only).
Please note: there may be delays to the usual delivery timescales over the Christmas period. Last day for next day delivery over Christmas 2019 is Monday 23rd December until Thursday 2 January 2020.
Please contact us on +44(0)1473 760059 for more details.
Functional & Technical
There are 3 types of heat transfer: Conduction, Convection and Radiant Heating. Infrared heating is radiant heating and it differs from conduction and convection because it transfers heat to objects and people directly, without heating something else in between (air, water, metal etc.). Convection heaters heat air, which rises to the ceiling where the heat is not required and can quickly disappear on draughts. Infrared heating directly heats the walls, floor and ceiling of a building to build up thermal mass which will then start radiating back into the room. Radiant heat transfer is a very efficient form of electric heating.
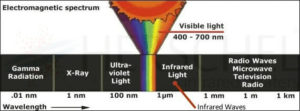
Far infrared is a type of infrared* that operates in the wavelengths above 3,000 nm. Also known as IRC and long wave, far infrared heating elements emit temperatures typically around the 100°C mark and have no visible light. Far infrared is the wavelength we are most interested in for human comfort because skin content is 80% water which absorbs heat most efficiently from wavelengths of 3 microns and lower (Far Infrared). This long wave, far infrared is better absorbed by the skin, is less transmissive (passes through) and is less reflected.. Far infrared is commonly used for heating homes as well as in infrared saunas and in the wellness sector. Infrared radiation is a perfectly harmless, natural form of radiation. In fact, it is recognised for its health benefits through deeper muscle warmth, in turn supporting flexibility and improved circulation.
Why do we perceive these far infrared rays as heat?
When far infrared rays strike an object they force the molecules in that object to vibrate. That vibration causes the object to warm-up– i.e to “heat”. The object warms up until its molecules are oscillating at the same frequency as the source.
Conversely, if the source then disappears, or operates sporadically, those objects then radiate out their own infrared heat. This effect is the same for humans as it is for objects. We experience absorbing infrared heat as ‘warming up’ and loss of infrared heat as ‘cooling down’.
If our environment is radiating more than we are (e.g. warm walls), we absorb the radiation and consequently feel warm. If our environment is radiating less than we are (e.g. cold walls), we feel cold, because we’re radiating out to it.
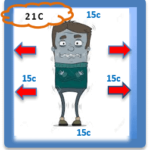
Why is it possible on a cold, sunny mountainside for people to feel warm?
Like the surface of the earth, humans naturally absorb infrared heat, if it’s available, regardless of the surrounding air temperature.
- Humans can feel warm in a “radiant” environment, when the air itself is cold because we absorb the radiation from our environment regardless of the air temperature (like skiers on a sunny mountainside).
- Conversely in a cold environment when the air is warm, humans still feel “cold” because they radiate out infrared. Police helicopters use infrared cameras to detect humans because at night time, against a cold environment, humans radiate more infrared heat than they absorb from their environment, and ‘stand-out’.
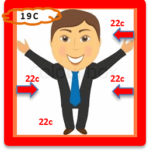
An experiment at the John B. Pierce Laboratory, USA, clarified this human perception of radiant heat.
“Test persons in a room with a temperature of 50°C (122°F) of warm air and cooled walls felt frozen; whilst in a room with a temperature of 10°C (50°F) of cool air and warm walls, they broke into an unpleasant sweat.“
(Source: Techn. Info “Strahlungsenergie – die Ur-Energie, neu entdeckt, TT Technotherm GmbH, Nürnberg).
What is the most effective type of heating for heating humans?
The fundamental requirement for effective human heating is therefore whether the heat source is radiant or convective. A radiant source makes for a more effective heater because it warms the whole environment around the person, which then radiates back. A convective source only heats the air and not the environment – implying a) you can still feel cold in a convection-heated environment and b) as soon as the heater switches off, the air cools down very rapidly.
Understanding the difference in infrared wavelengths for heating.
*Infrared wavelengths themselves are divided into 3 distinct categories, due to the different physical characteristics of each wavelength.
“Near Infrared”, “IRA”, “Short wave” or “Bright” Infrared heaters and “Heat Lamps” operate between 780 nm to 1,400 nm and emit temperatures of 1300°C and more plus a certain amount of “deep red” visible light. Applications of this technology include heat lamps for food preparation; large volume “Space” heating requirements and certain carefully controlled medical applications.
“Medium Infrared”, “IRB” or “Medium Wave “ infrared heaters operate between 1,400 nm and 3,000 nm and emit temperatures in the high hundreds of °C. Middlewave is valuable for Space heating in cold locations or where there is a lot of airflow due to its more transmissive properties over Far Infrared.
“Far infrared”, “IRC”, “Long wave” or “Dark Radiators” operate in the wavelengths above 3,000 nm. Far Infrared elements emit much lower temperatures, typically around the 100°C mark and no visible light. This is the wavelength used in domestic “comfort” heating and Infrared Sauna applications.
Please also see FAQ on Are there any standards governing Far Infrared Panels?
Of course! Herschel Infrared offer a number of patio heating solutions, including wall-mounted, suspended, and free-standing infrared heaters, all engineered for performance, efficiency, and durability. You can find out more about our outdoor heating range here.
The cheapest way to heat a house with electric is by using a technology that transforms electricity into heat efficiently. Infrared panel heating is a technology that uses electricity efficiently through direct transfer of the heat energy, rather than heating a volume of air. When considering which heating system may work best for particular requirements, it is essential to take into account total cost of ownership. Efficiency, capital outlay, servicing and maintenance requirements should all be considered and infrared heating panels provide a hugely compelling and competitive proposition for people. Herschel Infrared heating panels are a practical and efficient heating solution that is likely to be cheaper to install that other electric heating solutions. Herschel panel heaters also require no annual servicing.
Heater voltage is a common question that relates to single-phase heaters; why Herschel states 240v as the rated voltage limit of its single-phase heaters, and whether this is adequate (high enough) given total supply voltage in the UK can legally reach 253 volts.
The regulation on the matter is clear enough: that the input power of a heater must not exceed 5% of its rated power (as it has implications on product longevity, reliability and safety, quite apart from unnecessary extra running cost). We explain more why heater voltage is important here.
This depends on the ambient temperature and the levels of insulation of your building. Herschel Far Infrared heaters work by warming up the thermal mass of the room and on initial start up, this may take several hours and in some cases days, depending on the area to be heated (a damp basement room for example). It is very important to go through this phase to warm the thermal mass of the room for the heaters to work efficiently – cold walls and floors will not give occupants a feeling of warmth and wellbeing. For the system to work effectively all surfaces in the room should be at the same comfortable temperature and will start radiating back.
We recommend leaving the heaters on constantly until the room reaches the desired temperature. They then work most effectively by “topping up” the temperature using a thermostat control, being operated on a timer or a combination of both.
There are no maintenance and servicing costs related with Infrared heating panels.
There are no moving parts or liquids or gases that require any form of annual maintenance contract. The other major benefit of Infrared panels is that in the rare case one should go wrong, you only need replace the one that has gone wrong and don’t lose heat from the entire system (unlike central heating boilers, heat pumps, biomass).
Typical annual maintenance contracts of other heating solutions are*:
- Gas Boiler – £110 p/a
- Reversible Air conditioning – £132 p/a
- Air-water heat pump with zone controls – £210 p/a
- Biomass boiler £400
(*Average data from manufacturer and installer websites).
As a heating solution we are confident that infrared heating provides one of the most sustainable options for the built environment. There is increasing need for the population to reduce their reliance on fossil fuels and utilise low carbon, energy efficient technologies.
Herschel Infrared heating provides a future-proof heating solution that delivers lower emissions alongside improved efficiency and comfort levels for occupiers and can be coupled with renewable energy sources and battery storage. We have been chosen as the heating solution for a number of net-zero carbon emitting new homes, including the ‘COP26 House’ in Glasgow, built by Beyond Zero Homes, as well as a number of other eco builds built by housing developers. We are proud to have heated the COP26 House which achieved a 59% reduction on its whole life embodied carbon assessment versus RIBA’s ‘business as usual’ standard.
Herschel Infrared panels are solid state and present a zero maintenance, long life solution, with low embodied carbon. At Herschel, we keep sustainability at the forefront of our proposition and our infrared panel heaters are over 95% fully recyclable at end of life and our packaging is close to 100% recyclable.
We can provide heating solutions for all spaces and all applications including large or open spaces. As the longest established infrared heating provider in the UK, we have specified infrared for a huge number of projects across a broad variety of residential homes and commercial applications. Our experienced team of experts can provide a specification for any project and will recommend options for heating the space, taking into account the dimensions and height alongside insulation levels.
Managing electricity costs is a continuing priority for people as they seek to reduce their reliance on fossil fuels for heating and make the switch to electric heating. Electric infrared heaters will keep you comfortably warm whilst minimising energy consumption and electricity costs. Let’s explain how infrared heaters are energy efficient, how much electricity infrared heaters use and how you can use them to keep track of your energy bills.
How to calculate how much electricity your infrared heaters will use?
Infrared heaters offer people the flexibility to run their heaters in whatever way what works best for them. They differ from heat pumps which run for long periods of the day and rely on their coefficient of performance (COP) to keep the overall costs down. With Infrared, people can choose to only heat specific rooms or areas, they can power them in conjunction with time of use tariffs to prime the thermal mass and make the most of the opportunity provided by cheaper, off-peak energy tariffs, or however they choose. The difference with Infrared is that there is no need to run your heating 24/7. Decentralised control means minimising your energy consumption whilst maximising your comfort levels and this flexibility is how the cost savings are made.
Very simply, however, to calculate how much it costs to run infrared heaters you need to know your pence per kW hour. This is the price you are charged by your electricity supplier, as per your electric bill, for each kW of electricity used.
So let’s look at a Comfort 600W infrared heating panel, as an example. At an average of 6 hours a day, we can assume an electricity cost of 25 pence per kW (average as at September 2024).
Heater Output (kW) x Cost Per kW Hour (pence) x Hours in Use = Daily Cost (pence)
0.6kW x 25p x 6 hours = 90 pence per day
To understand the cost per room and per house, you will need to take into account how much wattage you need for each room and this will be based on the size of the rooms as well as their insulation levels. Our handy online calculator can work out a specification for you. Alternatively, our specification team can discuss your heating requirements with you and provide you with a free quote detailing what heaters you will need.
Will infrared heaters save me money?
Infrared heating offers an energy efficient heating solution due to the way in which it uses radiant heat technology to warm people and buildings. Not only are infrared heaters energy efficient in the way they heat, they can also save you money due to their zero servicing requirement plus their lower purchase and installation cost than alternative, low carbon heating solutions. We even offer some DIY-friendly and portable heating options.
As with any heating solution, the more you can do to improve the heat loss of your home, through for example insulation, the better and the lower your heating requirement will be.
Are there real-life scenarios of households that have made the switch to infrared panel heaters that show how much they have saved in energy costs?
Our customer contacted us to share how he had changed his heating system from gas and installed infrared, alongside solar PV, and this has given him an 80% reduction on his bills. Take a look at the case study here.
Why are infrared heaters energy efficient?
Radiant heat technology warms people directly
Infrared heaters use radiant heat transfer to warm people and objects directly, this differs from convection-based heating systems that heat the air. Air retains heat poorly and can easily be lost on draughts or cold spots. As a result, heating air requires much higher energy.
Turn your room into a 360° radiator
By using radiant heat transfer to heat objects, people and the fabric of the building directly, the thermal mass of the room warms up. The thermal mass is able to retain the heat, radiating it back into the room and keeping the environment warmer for longer. As a result, infrared heaters only need to be on to top up. This is why Herschel Infrared heaters save energy.
Targeted zone heating
Infrared heating is unique in its ability to heat specific zones or areas. Rather than heating every room in the house to the same temperature, even when they are unoccupied, infrared heaters can be used to precisely heat each room as and when you need it. Not only that, each infrared heating panel can be controlled independently. So, if you have a space in your living room that is frequently occupied and in which you’d like more targeted comfort, simply install a heating panel over that specific area and leave the unused areas unheated.
Zero heat loss
Infrared heaters are 100% efficient. Every watt of energy is converted into radiant warmth that can be used directly from the mains. There is no heat loss from clunky, poorly insulated pipes and little ‘infiltration loss’ due to warm air disappearing through open doors.
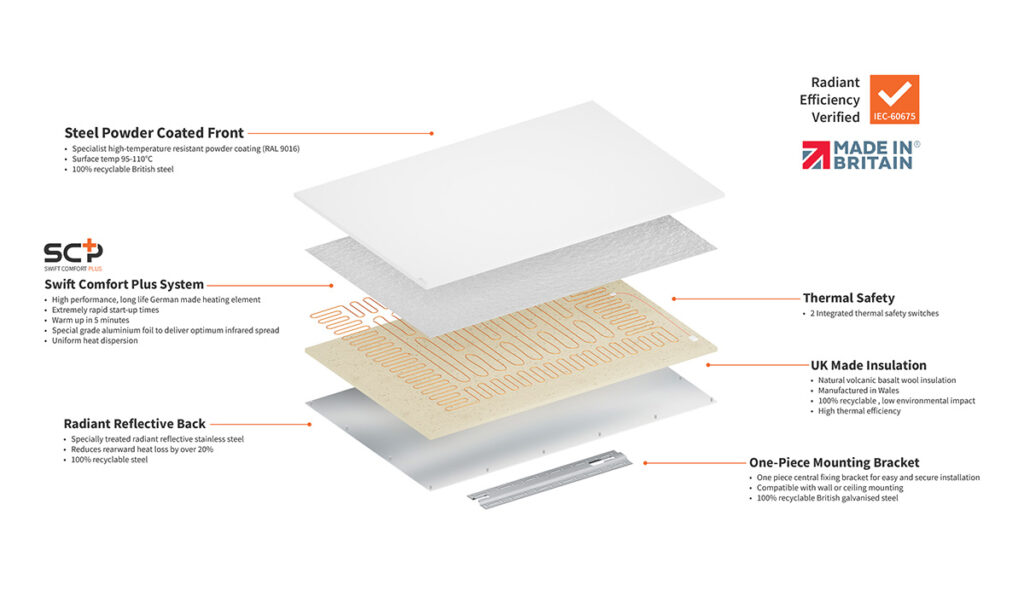
Leading the way in Innovation Development
Herschel is at the forefront of infrared heating and we have used our experience as UK market leader, alongside extensive research and development, to keep driving innovation in our infrared technology. Our UK made Herschel Comfort infrared panel heater features Herschel’s innovative Swift Comfort Plus system to deliver enhanced performance. This includes our new high performance, long life German made heating element which heats up to higher temperatures extremely quickly from startup and delivers an optimum spread of heat across the surface of the panel. A combination of high quality, UK made insulation material and a specially treated radiant reflective stainless steel back panel also reduces rearward heat loss by over 20%. The result is the best infrared panel currently available. Comfort has been tested and approved to the new IEC 60675 standard for radiant efficiency.
With a 10 year warranty, our solid state Comfort infrared heating panels contain no moving parts, offering a long life, energy efficient heating solution. For additional peace of mind for our customers, and for the environment, we’ve also made sure our Comfort infrared heating panels are fully repairable.
How do I switch to infrared heating and use it as energy efficiently as possible?
- Simply calculate your heating requirement by using our handy online calculator or, alternatively, we offer free specification quotes or virtual consultations with our team, consultation appointments can be booked here.
- Choose your infrared panel heaters and thermostat controllers from our full range.
- Once you’ve installed your infrared heaters, be sure to maximise the unrivalled control capabilities offered by infrared to manage your heating bills as efficiently as possible.
- With smart App-enabled, flexible control of your infrared heaters from anywhere in the world, our range of thermostats incorporate Lot 20 compliant Energy-Saving features such as Open Window technology and Adaptive Start.
- You can also set up your own customised heating routines via App control to suit your lifestyle, and benefit from geofencing to automate your heating and save you energy. Why heat your house when you are not there? The addition of our motion sensors can also save energy based on room occupancy, when used in conjunction with Herschel’s App-enabled thermostats.
Alongside our infrared heating panels for homes, we offer energy efficient heating solutions across the built environment including commercial, heritage and industrial buildings.
Infrared heating needs to be specified correctly to ensure the benefits of infrared are optimised. For homes, we have a handy online calculator which allows you to enter the details of your property and dimensions of the rooms you require heating in. This will then provide you with a recommendation of the Herschel infrared heaters that will match your requirements.
For commercial buildings or outdoor areas, indicative guides are available on our website to show the size of infrared heaters required. We also offer a free, no obligation specification service from our team of infrared heating specialists who will tailor a recommendation just for you. Our team can be contacted through our Contact Us page or by using our online chat facility.